RSS

Author Archives: ashevilleyardfarmer

Aieee! Tabasco sauce!

Lawd have mercy on my sinuses and throat — just finished making some homemade hot sauce from the Tabasco pepper plants in the garden.

We use a lot of hot sauce in our kitchen so I can kind of justify the pain by thinking of our voracious appetite for the stuff.

This is my second attempt, as batch #1 was based on a recipe that required fermenting the pepper mash (as they do at the actual Avery Island, Louisiana company). It started out well and the color was gorgeous but after a week something started going grossly wrong:


After the fact, I realized that I’d missed a crucial step in fermenting food:  making sure the mash was not exposed to air. (I blame the online recipe I used that didn’t include that info.) According to some more thorough recipes on other websites, this is accomplished by weighting it down with a plate or saucer, then putting a layer of salt water on top of that.

I hated throwing it out, since underneath that moldy top was perfect-looking peppers, but the smell was all I needed to know it had rotted, not fermented.  Ick.

So, when I harvested the most recent batch of Tabascos, I found a simple recipe that didn’t involve fermentation on www.friendsdriftinn.com.

One pound of Tabasco peppers, 2 cups white vinegar, and 2 teaspoons salt chopped in the food processor:

And just like when I made horseradish sauce in the food processor, my kitchen was filled with tear-jerking, throat-searing fumes from these tiny peppers and their seeds.  Now, this time I didn’t wear gloves and I was very careful not to touch the sauce.  (I can only imagine the world of hurt I’d have been in if I got that in my eyes).

The recipe then calls for you to bring the mixture to a boil and then simmer for 5 minutes.  As I’d expected, heating this lava-like concoction only makes your eyes water and your lungs burn more.  All I could think was how in the world people work in hot sauce factories.  They’d have to wear gas masks and goggles.  It is wicked!

I tried using the immersion blender in the pan to further liquefy the mixture after it finished cooking, but I just couldn’t take it any more, so I poured it into a quart jar and blended it inside that.  Much better.

Now I’ve got it in the fridge, and the recipe says to let it stay there for 2 weeks, then strain the mixture and add vinegar to get it to your desired consistency.

In case this batch doesn’t work out (I don’t see how it can’t with all the vinegar it’s got in it), I do have some more peppers waiting:  two weeks ago I pulled all the Tabasco plants out of the ground before our first frost hit here in the Southern Appalachians.

And now I’ve got them drying upside down in our basement (right above the dehumidifier!):

lll


End of summer veggies. Getting ready for fall food.

How does fall sneak up on me so fast?  All of a sudden we’re in coats and long pants, and the leaves are turning.

Fortunately I did get my summer garden cleaned out, with the exception of the pepper plants.  They are the most prolific ones I’ve ever grown.  I’m crediting the weather this year, along with the new irrigation system that James’s dear cousin Jaime installed for us in the raised beds in July.  (Just a few weeks after he got it finished, he passed away unexpectedly at the age of 44.  Every time the irrigation comes on, I think of him and thank him for helping improve my garden and harvests.  I’m so sad he’s not here to enjoy all the habanero, serrano, tabasco, and poblano peppers that are still coming in.)

Here are some of the yellow and Cubanelle peppers — we’re still harvesting them, enjoying them raw, in salads and stir-fried.  So sweet:

The yellow peppers are now being joined by red peppers — they took the longest to mature out of all our pepper plants, and they aren’t really worth the wait.  The yellows are by far my favorite.

The darker green peppers on the left are poblanos.  Some of them grew to be quite large, almost as big as the yellows but not as thick-walled. They had a slight kick to them so we sauteed or stir-fried them.

I’m the only one in the family who likes eggplant.  I love to roast it and make baba ganoush.  These small globe eggplants were perfect.  From just 3 plants, I got enough eggplants to make several batches of baba ganoush and freeze it.  I harvested the last two of them in mid-September.

And my winner crop this summer?

Greasy beans from Sow True Seed.   I grew them up trellises on the sides of the raised beds.  They were delicious — I steamed them, boiled them when they got too big, and finally canned 24 pints of them, turning them into spicy crunchy dilly beans.  I combined a couple of recipes (as I didn’t have any fresh dill weed on hand when I got everything going in the kitchen) and they turned out great.

I spent alot of time on the porch stringing those greasy beans.  But that’s one of those gardening activities that goes perfectly with hot late summer afternoons.  I was also able to enlist help from relatives over Labor Day weekend so we could all share some, cooked down with sliced onions and a nice helping of butter.

Now we’re in an in-between stage, waiting on the broccoli, collards, cauliflower, brussels sprouts and kale.  In the meantime, I’ve been thinning radishes, arugula, asian greens and a couple variety of lettuce seedlings, and using those on top of salads as sprouts:


A terrible time to drop my new camera

Six weeks ago I redeemed accumulated frequent flier miles for a Best Buy gift card.  I had enough miles to get a Nikon DSLR (the 5100).   After getting the camera, I even took a one-day refresher photography class to help me get back in the game.

Well (sigh…) last week while I was making smoothies in the kitchen with the boys, I dropped my new camera on the kitchen floor and the lens mount broke.  And the flash was messed up.  And it was making a weird noise when it was focusing.

Bad, bad timing to break the new camera I was beginning to really like.  Not only have I enjoyed posting much better-quality pictures on my blog recently, I also realized that I’d been missing out on chances to take great photos of my rapidly-growing kids.

And this past weekend, I missed getting some great shots of my 5-year-old’s birthday party. Thank goodness for my next-door neighbor and his photo skills!

And also this past weekend, Asheville was the host city for the Garden Blogger’s Fling 2012  — which included tours of some awesome gardens around town.  Well, at least I live close enough that it’s not too inconvenient to go back and get some photos of things I really admired — like the artichoke plants at Nan Chase’s house.

Well, the happy part of this story is that, for the first time in my life I purchased the damage protection plan on the camera, so I was able to take it back to Best Buy and let them handle getting it sent off and repaired at Nikon — at no extra charge.  They’re telling me it will be another week or so before it’s back in my hands (which will be much more cautious when holding the camera and trying to document sneaking beet greens into my kids’ smoothies).

And here are some photos I took in my yard just before I broke the camera…I’m looking forward to getting back out there with it!

I bet this is one of our bees….she was loving the sage blossoms!

 
2 Comments

Posted by on May 21, 2012 in Uncategorized


How to get a kid to eat broccoli

Just in the past week, I’ve been  harvesting the best broccoli I’ve ever grown.  It is super-crunchy, very tasty, and robust enough to have warded off the usual attack of the cabbage worms.

This broccoli doesn’t even make it through the front door without my 5 year old chomping into the florets.

He loves to help me find the crowns that are ready, then he waits stealthily until I’m occupied with pulling up a weed or picking another veggie — and he starts chewing away at it.

This broccoli is so good I’ve been just barely steaming it if I do cook it at all.

Now, in order to get my younger  boy to eat it I have to put butter on it.  But I’m just happy he likes it too especially considering how picky of an eater he can be.

The cauliflower plants aren’t quite ready yet.  I am curious if this guy will attack them post-harvest as voraciously as he does the broccoli…..

I always seem to be in the garden barefoot.  Note inadvertently color-coordinated  toenail polish shade.  Trying to think of a good new cheezy name for that color…”Broccoli Breeze”….


Tags: ,

Boys in 2010 with their cousin and the Mantis

We have had a large metal praying mantis sculpture in our yard for a couple of years.  Now we have about 500 of its real-life counterparts inhabiting our garden, thanks to an early birthday present for our 5-year old from our good friends.

It’s definitely a great gift for a 5-year old boy — but I must admit I was as excited about it as he was.

I’ve always heard that praying mantises, like ladybugs, are great predators for garden pests, eating all kinds of caterpillars and grubs that like to mess up good things growing.

We’ve also captured praying mantids in our house a couple of times and watched them for a day or so, and have been amazed at their lightning-quick forelegs and voracious appetites for moths.

This excellent birthday present was 2 egg cases, which the container said held approximately 200 baby mantids each.  The container also said it would take 2-6 weeks for them to hatch — you could put the egg cases outside in a tree or bush.

Click on pic to enlarge and you’ll see 3 baby mantids

Or better yet you could put them inside a glass bowl inside to watch them eventually hatch.  Well, I don’t know what size glass bowl they were talking about, but I sure am glad I put them in a mason jar with a lid because the morning after we got them, there was a jar full of hundreds of tiny mantids darting around inside trying to get out. ( I can’t imagine trying to herd all those mantids up from inside a house!)

.

We all ran outside (after our 3 year old fell down the stairs in the midst of all the excitement — poor guy), my birthday boy unscrewed the lid and we watched them hop fearlessly from the glass to the green arugula and spinach leaves.

They were a tiny army — and a thirsty one at that, as they each immediately stuck their faces down onto the leaves to drink the dew from the night before.

We checked on the mantids after I picked the guys up from preschool at noon, and we found many of them perched on the tops of leaves in the garden, waiting for their next victims.

I’d put both egg cases back into the jar as I couldn’t tell which one was the one that had hatched.  Thank goodness.  Two mornings later, I came downstairs to find another jar full of baby mantids raring to get out.  I thought maybe the raised beds in the front yard had plenty enough pest protection from the first release of mantids, so I dispersed the second hatching onto the plants in our perennial garden in our backyard (including on our apple trees, blueberry and raspberry bushes).

Here are some more photos of these cool hunters after we turned them loose in the garden:


Tags: ,

Raised cedar bed kits — at the hardware store!

I’m happy to see these kits available at the North Asheville ACE hardware store near my house.  I’m also slightly envious that somebody beat me to it.

When I saw them, I instantly had that “hey, I could’ve made and sold those years ago!” thought — which I guess is kinda like when people see a cool piece of art yet say “hey, even *I* could have done that”.  Oh well, you snooze, you lose, right?

I imagine that these will sell well — easy to assemble, fairly manageable size/weight, and the price isn’t too outrageous.

So they’re good for folks who don’t want the DIY experience of building beds from scratch, which can be time-consuming.  It eliminates the need to go hunting for cedar lumber and needed hardware, and making all the cuts.

The packaging also says they’re “stackable and expandable” so you’re not limited to the size, which is 4 feet square and 7 inches deep.  I think that’s a great size for someone who’s starting out with their first garden — but even better, it can grow as you learn.

Not only do these kits take the hassles out of building your own beds, they even tell you exactly how much soil you’ll need to fill them: 8 cubic feet.

I’m all for anything that gets folks gardening and growing their own food — and I think this is a great idea especially for beginning gardeners and/or people with small yards. Hurray for more yard farmers!!


Tags: ,

Spinach hummus

My 3 year old’s favorite “vegetable” is spinach hummus by made by Roots, an Asheville company.  I’ve not been able to find it in my local grocery store lately, but did find their regular hummus (which is also some of the tastiest store-bought hummus ever) and decided to try to make my own version.

Yesterday afternoon in the garden, the boys helped me pick a few cups’ worth of spinach leaves (which, by the way, was much less exciting to them than pulling up fat radishes, but that’s another story).   Then we washed the leaves and pureed them into a pulp with the immersion blender:

I added just a few tablespoons of water to get the process started.   I had a total of about 3 cups of fresh spinach leaves.  Oh, and it helped to chop them up with a knife before trying to use the blender.

Fresh raw spinach smells and tastes so sweet.  No wonder you can drink smoothies with that as a main ingredient.  My 5 year old wanted to eat it just as it was, without mixing it in with the plain hummus.

Note little bro licking the lid of the hummus container as he’s watching his big bro at work.

The 3 cups of leaves ended up being about 3/4 cup of spinach puree, which we stirred in with the plain hummus.  It was so good they finished the entire container off in about 10 minutes.

Preschooler wisdom: It's always important to have a flashlight handy, even when you're devouring spinach hummus on a sunny afternoon.


Tags: , ,

New bees!

Last November our backyard beehive was raided and torn apart by a few hungry bears.

It’s been sad looking out at the corner of the yard where the hive had been.  I’ve missed those bees and their constant stream of activity that I used to watch from my kitchen window and deck.

This morning I headed north to Madison County to Wild Mountain Bees to pick up my new hive.  In beekeeper lingo, what I got is called a “nuc” —  a small, basic hive (including a queen) that you transfer into a larger bee box where they will produce brood and expand their population.

Nucs awaiting pick up at John Christie's Wild Mountain Bees

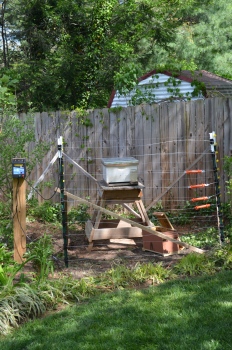
In preparation for the arrival of our new bees, I enlisted my brother’s help in getting an electric fence built around the hive site to keep hungry bears out.  Many of Asheville’s urban beekeepers lost hives last fall to bear raids,  and the only solution I’ve heard of is electric fencing.

Now, it’s not as pretty as when I had my simple cypress “cottage hive” without this web of shiny wires, black plastic control box, plastic orange gate latches, and green metal fencing posts — but practicality won over garden vanity here:

In an effort to keep things simple, we decided to use the more common size bee box to transfer them into (with 10 longer frames instead of 8 shorter as I’d had previously).

So I’m saving the old 8-frame boxes with the hopes of catching a swarm again this spring (I’ve put requests out on Facebook for anyone seeing a swarm to give us a call — and have since received one reply from a friend about a hive living in the wall of her in-laws’ house in Montford!  However I think that’s WAY above my beekeeping skill level.  Sounds like a rather surgical removal….)

To welcome the bees to their new home, my 3-year old boy donned his suit and helped hand supplies to us as we transferred the bees from the nuc box to their bigger, permanent box: 

My brother getting ready to transfer bees

My brother getting ready to transfer bees


The bees were really mellow for having been closed up in the nuc box and ridden in the back of a pickup through the winding back roads of Madison County and at highway speeds back to Asheville for 30 minutes.  I’m thinking that was due to the low temperatures this morning.  But by the time we’d opened the nuc box it was almost 50 and sun was shining on the new box.  We found the queen quickly:


She’d been “marked” with a yellow dot on her back to make it easy to identify her when inspecting the hive.  I was able to find the queen in my old hive even though she wasn’t marked — the queen has a longer abdomen than all the other bees in the hive.

After we’d gotten the racks of bees transferred, we sat in the yard and were mesmerized watching them flying around the hive and getting their bearings.

Me and my helper! (Note massive headband -- nothing more annoying than having long hair get in your eyes and face when you've got bee suit hat on -- I learned the hard way so the headband is now a critical part of my bee suit ensemble!)


Tags: , ,

Link

Why folks in WNC say “don’t plant before Mother’s Day”

It has been such a lovely early spring with way-above-average temps.  I got lulled into thinking we wouldn’t have any more sub 32 nights.  Mmh-huh.

Oh yep, I’ve already planted 3 tomato starts.  Headed to basement to get hoops and plastic to cover that part of the bed.  Also need to get out sheets to cover our big Japanese maple. 

 
Leave a comment

Posted by on April 11, 2012 in Uncategorized


4 pounds of fresh spinach — a good recipe

My spinach has done so well this spring that I’ve been enjoying it for well over a month and have shared it with several friends.  I prefer it raw — in salads — when the leaves are small.  However, it got crazy on me and grew big and not quite tender anymore.

So I looked in my Mark Bittman How to Cook Everything cookbook, found a good recipe for “spinach croquettes”, then picked and picked and picked and came up with a sink full to wash:  

And that was the hardest part of the entire recipe.

Spring greens from the garden — lettuce, arugula, spinach, cress —  have the most labor-intensive preparation than anything else I grow.

I end up washing them a few times then inspecting both sides of each leaf before eating or cooking them.  It’s not the garden dirt that I mind — it’s slugs and cabbage looper worms that turn off my appetite. I know, I know, crawly critters are considered a delicacy and/or protein in some cultures.  And their presence is a better alternative to nuking my plants with pesticides.   Instead I raise our water bill considerably in the spring making sure my greens are critter-free.

My boys love weighing our garden veggies on this old scale that belonged to my grandmother.  It’s a trick great way to get them helping out in the kitchen when Preschooler Witching Hour is nigh (’round about 5:15pm).

Here’s the final product, which was thoroughly enjoyed by both boys (even the picky one) — spinach this way is deee-licious.  It was sweet, not soggy or bitter at all.  (I’d taken the other croquettes out of the skillet before I took the picture — you can fit about 8 in there at at time.  I think the whole recipe made about 18 — I’d doubled it).

And here’s the recipe from Mark Bittman’s How to Cook Everything:

SPINACH CROQUETTES

MAKES:  4 servings  TIME:  30 minutes

INGREDIENTS

  • Salt
  • 2 pounds spinach, trimmed of thick stems and well washed
  • 1 medium onion, roughly chopped
  • 2 eggs, lightly beaten
  • 1/2 cup grated gruyere, cantal, or other fairly strong cow’s milk cheese [none of which I had so I used some mozzarella instead]
  • 1/2 cup bread crumbs [I used panko crumbs]
  • freshly ground black pepper
  • 2 tablespoons extra virgin olive oil
  • 2 tablespoons butter (or use more oil)

1.  Bring a large pot of water to a boil and salt it.  Add the spinach and onion and cook for just about a minute, until the spinach wilts.  Drain thoroughly and cool a bit.  Chop the spinach and put it and the onion in a bowl, along with the eggs, cheese and bread crumbs.  Mix well, then add salt and pepper to taste.  If the mixture is too loose to form into cakes, add some more bread crumbs; if it’s too dry, add a little milk or another egg.

2.  Put half the oil and butter into a large skillet, preferable nonstick, over medium heat.  Form the spinach mixture into small cakes and cook, without crowding — you will have to cook in batches — until nicely browned, adjusting the heat so the cakes brown evenly without burning, about 5 minutes.  Turn once, then brown the other side, again about 5 minutes.  Continue until all the spinach mixutre is used up.  Serve hot or at room temperature.”


Tags: , ,